
"Crab Apple Tea" is the last of the new pieces for this season. I usually do 8 to 10 each year during the winter months but this year I had more commissions than usual and spent allot time on the marketing end of the business. As it turned out I'm satisfied that I did the right thing.
I offer prints of most all my drawings. This adds to the overall money invested each season...with the economy the way it is, I've tried to keep my show costs down this year.
For those interested, "Crab Apple Tea" took close to 40 hours to complete, which is why you haven't heard from me much this week. I had to get it done because I had an appointment to have everything high resolution scanned on Wednesday. Made it by the skin of my teeth!
I've done some corrections in photo shop elements and but can't tell what they will look like until posted...so will come back and do subtle corrections at a later date and add more text. It's been a long week so far, going to try to get to bed before midnight for a change.
Hope you enjoy seeing the process,
Marsha
Crab Apple Tea...work in progress photos
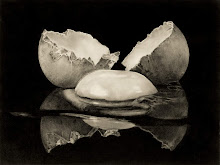
 Step One...You can see here how exact the line drawing is that I start with. Because I'm using carbon pencil this initial drawing needs to be as exact as possible. I've started laying down 6B carbon in the upper left...blending it until the paper is 100% covered using a stump. You can also see part of the glass outlined...when I'm going to make the background dark like this, I always outline the adjacent subjects using a B or 2B carbon pencil so as to preserve the edges.
 Step Two...You can see in this photo how I've progressed around the glass of tea and on down to the table. Outlining the adjacent subjects as I mentioned, will maintain the accuracy of the glass shape, assuring that you don't loose this line while blending.
 Step Three...I've begun on the glass (my favorite subject). If you check the image above you will see that this is all about identifying and drawing the shadow shapes. From here on out I will be shading the various smaller shadow shapes found within the the larger shapes outlined in the initial drawing. The darkest areas are applied directly to the paper using a 4 or 6B carbon pencil while the lighter areas are applied with a stump. The base color for the tea was applied using an artist brush.
 Step Four...I continued applying carbon with an artist brush, creating the subtle shadows and highlights in the tea and sculpting the shape of the crab apple in the glass. I've started on the cinnamon sticks, making sure not to leave out the reflected highlights on the front of the glass.
 Step Five...The glass and the crab apple on the table are pretty well defined at this point. There are still some subtle shadows to incorporate but for the most part I'm satisfied.
 Step Six...starting again on the left, I've defined the table and begun on the cut lace doily. To render the wood table, I first made marks with a 6B pencil for the wood grain...then added a solid flow of carbon using first a stump (loaded with carbon) then a chamois. Carbon was applied to the doily, defining the shadow shapes, using a brush. I've also worked a little more on the glass of tea and deepened the shadows on the crab apple laying on the table.Finished Drawing...This is a camera photo, not the final scan. I should have this drawing posted to my website in the next couple of weeks. The scans are done, I just have to upload and correct them in photo shop. The difference in the amount of detail a high resolution scan captures compared to a photograph is amazing. My camera lens does a good job but just can't compete with the final scan.
 Crab Apple Tea will be offered as a print...check my website later for price and availability.
Links:
Website ...Marsha Robinett Fine Art
My Squidoo ...Drawing Techniques
PS...make a "Point"...leave a comment.


11 comments:
Marsha,
Another successful piece! I enjoyed looking through the progress photos and reading about your process. 40 hours doesn't seem too long for that amount of detail. Is the final piece sprayed with some sort of fixative?
My, my, my this is scrumptious!My favorite to date. I can see why you love carbon pencils as they offer such darks and subtle tones and values that are wonderful. The detail work on the cut lace is beautiful too. Well done! Limited Edition??
A stunning piece Marsha. Wow! Your mastery of the medium really shines through!
I especially like the objects you chose for your still life. I like the arrangement of the elements of the piece as well as the quality of light that you captured.
Thanks for sharing the WIP photos. I enjoyed watching the piece progress.
You must be very happy with the end result as this is truly a beautiful piece. I am sure this will sell very well as a print. Wishing you lots of success and I hope you got some rest!
This is absolutely gorgeous Marsha. So glad you posted the progress steps. It's great to see how other people work. Thanks!!
Marsha I'm back again - will you tell us how you went about setting up this still life - what kind of lighting do you use, back drop - the technical stuff? Do you have a place in your studio or did you set it up in the kitchen? Did you then work from a photo or just from the still life itself? Sorry for all the questions. ;-)
OK...I'm back, had to walk away from the computer and the drawing board to catch up on some of the necessities of live that had been ignored the past couple of weeks!
Holly,
I'm glad you enjoyed seeing the process. I plan on turning this one into a full tutorial at a later date and will go into even more detail...time just didn't allow for this now, and yes I always spray lightly, twice, with a fixative. When there is this much solid dark background everything is really vulnerable to smearing even after using a fixative.
Karen,
Thanks Karen, I do love my carbon pencils. The darks could have been achieved with charcoal but I like the warm tone value of the carbon. Limited Edition?...not sure, according to the guide lines I've set for myself (which I'm constantly questioning) it will probably be an Open Edition. I personally feel from a technical point it should be a Limited...have to think on this.
Teresa,
Yes, I am very pleased with this piece. I think it is one of the best I've done yet. It's interesting, as I look at things I'm always looking for the light. It's just a natural way of "seeing" for me.
Jeannie,
It's hard most times to make myself stop and take photos, but I've finally figured out a set-up that makes it less inconvenient. And, with this drawing it was soooo intense that stopping was a necessity. Glad you enjoyed seeing the process.
I keep watching your site for new work...is there anything on the drawing board to share?
Karen,
I need to first say that 100% of everything I know about art and photography I've learned from others...which was the inspiration for the "Weekend Chat Line" question that I post each week.
The initial photo that inspired this drawing was downloaded from the Wet Canvas image library last year. I had been struggling with photographing glass...just couldn't get the reflections I wanted to see.
I took this photo, bought the crab apples, (had to stick a twig in the one beside the glass because my crab apples were "stemless"), and cinnamon sticks, (I had the glass), and did my set up using a tea towel instead of the lace doily.
I wanted to learn how to better catch the light and needed an example or goal to work towards. The process of trying to duplicate someone else's photography taught so much.
I have a really rudimentary set up. Since you ask, I will tell you but you've got to promise not to laugh!
Yes, I do my still life photography on the kitchen counter. I just don't have any place else the right height and I make use of the florescent tube to the right, above the sink.
I've made my self a three sided "box" using black foamcore board. The sides are hinged together using black duct tape...leaving enough space between the pieces so they will fold down for storage. I have cut additional pieces in white, cream, and gray that I can clip to the inside to change the color if I want. This works really well and was inexpensive to make. I can fold one side back to let light in and the black doesn't seem to reflect to badly. When I'm using a "drape" behind my set-up, I thumb tack it to the under side of the cabinets...forming folds!
For lighting...I use anything I can find. I have several different size flash lights that I use...one is really small. (The dish drainer on top of a box in the sink or on a chair works great to balance a flashlight...I've even tied them to a step ladder!!) I also sometimes make use of the fluorescent light above the sink and I've purchased a Testrite Artist Studio Light from Utrecht...using different size bulbs. I sometimes hang piece of white sheeting or put a piece of paper in front of the light for a diffused effect. YOU'VE JUST GOT TO USE YOUR IMAGINATION...or spend big $$ on a professional set-up. SEE WHY I TOLD YOU NOT TO "MAKE FUN"?
Back to the drawing "Crab Apple Tea"...I actually used both the photo from Wet Canvas and the one I had taken as reference. The shadow shapes in the glass and the crab apple laying on the table are from my photo. The lace doily and the "stem" are from Wet Canvas. For the glass itself I actually referred to both.
I wish I had the knowledge to be more technical...but I just keep shifting the lights around until I get the look I want. It gets easier each time. As I said in the beginning, find a photo you like and work on recreating the brightest highlights and deepest shadows. It's an invaluable learning experience.
Wow! this is a long answer, hope this helps.
Marsha, thanks again for sharing so generously, not only the wip pictures but for taking the time to discuss the details of doing the set up. I doubt many of us would laugh at your homemade setup - it sounds similar to what everyone I know does! I have a foamcore "box" with painter's tape instead of duct tape. What I do differently is my stand: I use a photography tripod with a board mounted on top. This allows me to alter the height, and to rotate the still life to look at different angles and lighting. Sometimes I setup directly on the board, but more often with the foamcore on the board first. If I want a reflective surface I use a piece of black plexiglass. I'm lucky enough to have the room to leave the setup in place, so I can work from both the photo and from life, getting the most possible information.
Enough of that - what I really want to say is that this is a Fabulous piece!!
Gorgeous drawing Marsha! The light is perfect, you've outdone yourself on this.
I recall this image from WC too and I too like to try to recreate something I see that I like. Its good to make something your own. My setups are wherever the good light is and that can range from the bathroom to the kitchen counter depending on the season.
Marsha, it seems impossible but your work gets better and evolves with every new piece. This is simply stunning!
I love the WIP (as you know I finally bought some carbons but haven't had time to try them yet)
I was interested in your comments on the scanning process - I haven't had any luck with high-resolution scans capturing the right color in my paintings, they are always washed out - so I've resorted to taking macro photos in natural light and then adjusting the resolution manually to 300dpi after the fact. It's working out perfectly as I have so much more control.
But after reading your comments, I wonder if I should try a different graphic shop for scanning and see what the outcome is.
Thank you so much for sharing!
christy
Terry and Jeanette,
I'm glad you like this piece...I think it's going to be a favorite of mine also. As for "our" photography set-ups...I guess creativity is not only for art!
Christy,
Thanks, the more I worked with this still life set-up, the more I liked it. My lighting was never quite as good as the original WC photo but I was pleased just the same.
As for the scans, in the beginning I sent them out of state to a professional photo finishing service that was recommended by a photographer friend. My niece has done the last few...she has access to the University of Illinois Computer lab, and we use one of their state of the art scanners,(no pun intended).
Like you I've struggled with this. The images we post on our blogs and websites are for many, the only way they ever have to see our work. I've seen so many artists with what I know is great work...but their images are just bad!
It's just one more thing we as artists need to learn. Don't you sometimes just wish you could just create art!!
Post a Comment